
Jannine's Backyard Pond and Native Garden
Jannine Thorp has been a resident of East Islip for the past 9 years, and a lifetime resident of Long Island, growing up in north Mastic. Her favorite memories as a child include gardening with her mom and discovering nature in the woods behind her house. Now with a family of her own, she hopes to pass on her love of nature and gardening to her two daughters.
Below, she shares a detailed account of the incredible transformation of a “drab corner” of her yard to a pond with native garden, even as she battled Covid on the front-lines as a health care worker while home-schooling her two daughters!


Big Dreams, No Time!
When we moved into our East Islip home 9 years ago, I always looked at this drab far corner of the yard and imagined a little pond there. It would be small and peaceful, with a sweet little waterfall and a few little goldfish. But I shrugged off this longing for a water feature of my own thinking it was too complicated, too expensive, and too difficult for me to attempt. I focused on my existing gardens, filling in the pre-existing gaps with colorful annuals and a butterfly bush for “the pollinators.”
Last spring, I was introduced to the idea of native gardening in my quest to attract butterflies and birds to my garden, which my young daughters love to see, and I enjoy just as much. I try, in so many aspects of my life, to live in an eco-friendly, sustainable way, but I never previously considered that my choice of garden plants could have such an environmental impact. I live in the suburbanist of suburbias, at the birthplace of the American Lawn, on Long Island, NY – which is a hassle to maintain, and essentially an environmental desert for our wildlife, insects and birds. I purchased some Eupatorium purpureum (Joe Pye Weed) and Asclepias tuberosa (Butterfly Milkweed) along with a few random “native wildflower seeds” at that time last spring and created a little garden on that drab side of the backyard.

My first little pollinator garden in full sun (mixed native plants and sunflowers), flanked by Betula populifolia (grey birch) and Magnolia virginiana (sweetbay magnolia) with Cornus florida (flowering dogwood) on the far right.
Designing the Pond
Enter 2020, Covid-19, home-schooling, murder hornets and quarantine. As a healthcare worker during the most unique and stressful time of my career, I decided there was no time like the present to expand my native pollinator garden during the springtime, which now encompasses a 30 x 7’ stretch along my southern backyard fence.

The expanded native pollinator garden
When this was nearly complete, there was a part of this garden that was still, yet, empty except for some invasive weeds. I wanted to fill it with something for myself, for our environment and for my daughters to enjoy.

Elevated photo of empty area begging to be a pond.
I finally decided to take the leap and started drawing out plans to build a pond. I wanted something that would appeal to the birds, such as a shallow beach area; something aesthetic and peaceful for my soul, like a waterfall; and areas to provide a native habitat and water garden for plants and maybe some small native fish. I also wanted a narrow area of the pond to usefully utilize the adorable bridge I recently added to my online shopping cart. As an extension of my native plant and pollinator garden, I decided to make the choices around the pond as native to the Long Island area as possible.

One of my first sketches of the garden and pond plan
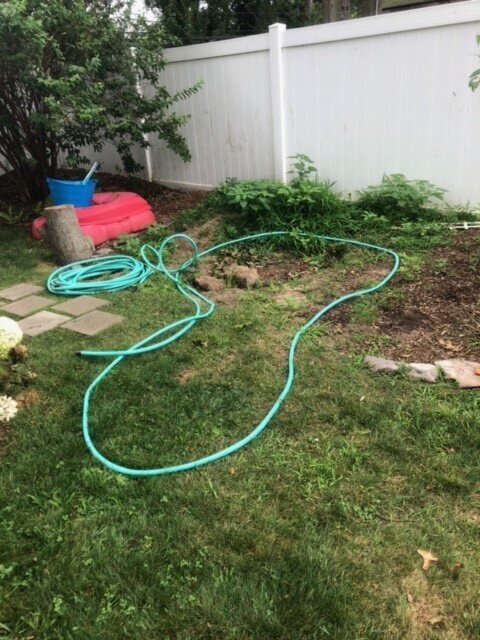
What started out in my mind as a small three foot round pool, quickly filled the empty area and after reading some blogs and articles and watching a few You Tube videos, I started with a garden hose, changing the shape until I liked the way it filled the space. I kept it there for two weeks, just to be sure I was ready for this undertaking.
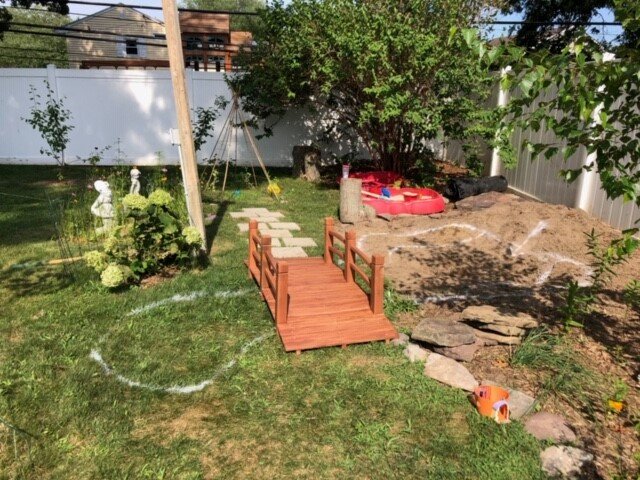
Then, on my first day of vacation at the end of July, I outlined the hose in white spray paint and started digging.
Creating the Pond
I did employ some help from my neighbor’s teenage son for a couple hours, and my husband for about ten minutes until he inadvertently found a sprinkler hose with the point of the garden pick, but the majority of the digging was with my own two hands. With the help of my mentor and friend, I decided to overcome the inconvenience of a sprinkler hose running directly through the middle of my pond by building a bit of an underwater “hill” in the narrow part of the pond to cover the now-repaired sprinkler hose. I was glad to find a solution which didn’t involve ending the pond several feet sooner than I wanted to.
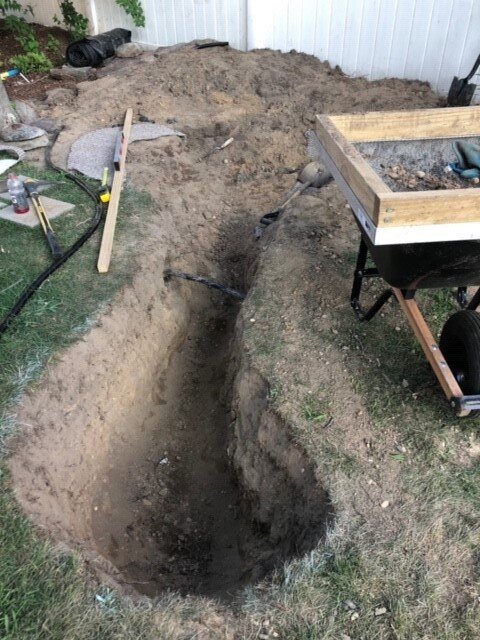
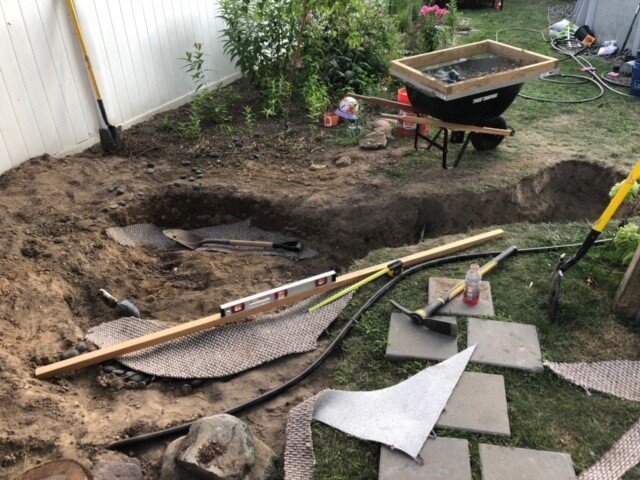
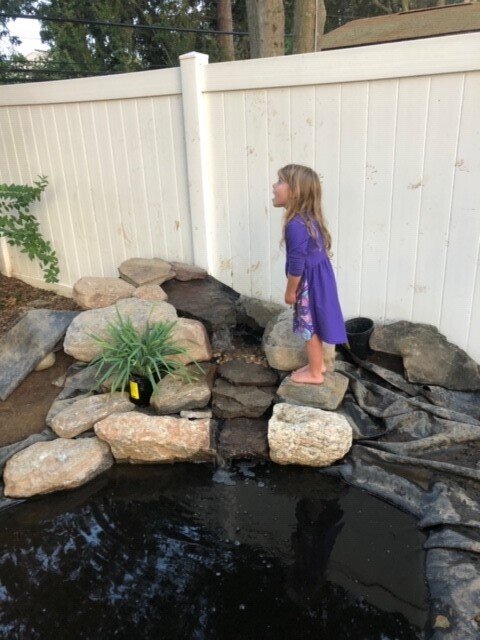
As I dug, I screened out all the dirt for the pebbles (see above picture), which would later become the pebbles for my shallow “beach” area. And used some of the dirt to build up the waterfall and the rest evened out my yard in various places. I also tried to focus on using a flat board and level to ensure that there was no side of the pond significantly higher than another, so that once filled with water, there wasn’t a big discrepancy in the waterline from one side to another. The pond is almost 2 feet deep with three separate shelves, one of which has a gentle upslope to a pebble beach.
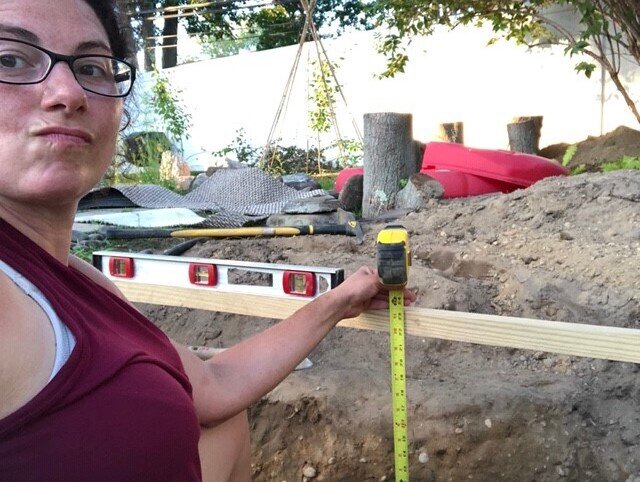
At its widest and longest, the pond is about 8’ x 12’ and 2’ deep, and using an online calculator, that corresponds to about 1200 gallons. It is probably realistically about half of that once you factor in the shelves and the shallow areas, but I purchased a pump which would be appropriate for 1200 gallons. The pond liner, one of the single most expensive purchases for the project, was 15’ x 20’ which seems too big but it was just the right size for this pond once you factor in the 2’ depth of each side, etc.
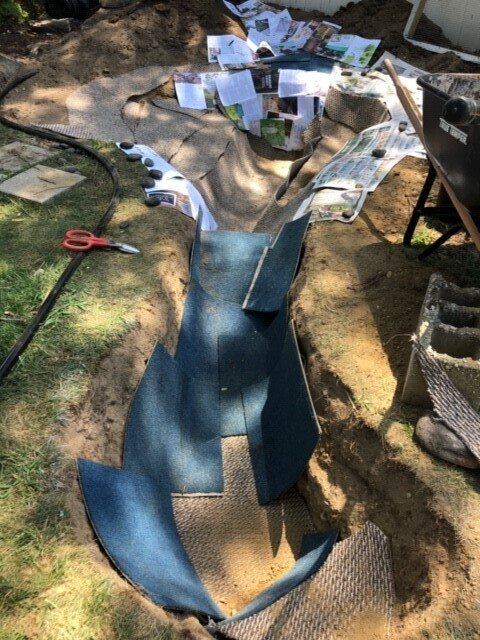
Instead of purchasing an underlay, I had read you could use carpet or newspaper and a friend had leftover low pile carpet she’d just had put down and I used mostly that and some old carpet squares my parents had. In retrospect, it was probably more difficult to use the carpet compared to an underlay (which is actually not too expensive) and who knows what kind of chemicals may be in that carpet that is now in my ground. So, if there is ever a next time, I would just use the commercial underlay.
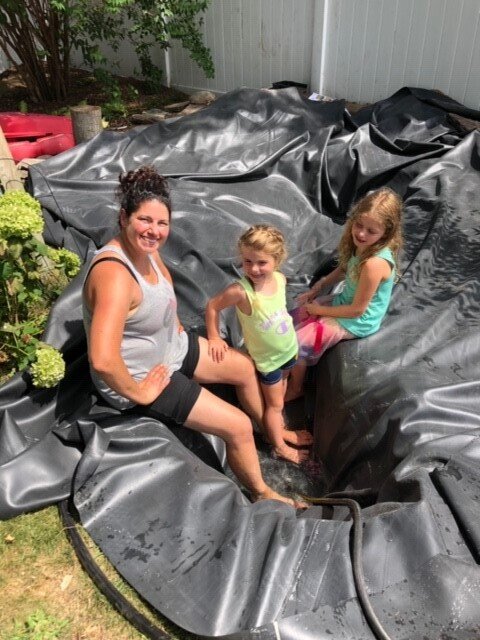
Filling the pond was one of the most fun parts, for my kids anyway. I tried to focus on making sure the edges were flat and corners were tucked so there was one fold instead of several. I laid some rocks we had lying around on some of the edges and started to turn my focus to the waterfall.
Installing the Waterfall
This would be the most challenging part of this project. I had set the pump on the furthest and deepest end of the pond and laid the tubing through the pond and up the beach, then buried it in the “hill” to the top of the waterfall. I used an 8” waterfall spillway from Lowe’s at the top filled with lava rocks for extra filtration. I started laying the large, flat rocks I had purchased at the pond store starting from the base of the spillway but whatever I did, I could not get it to balance on the rocks all the way to the bottom rock. It inevitably spilled off one or both sides and the bottom rock (which was the largest flat rock I had), was dry. This was frustrating so I shut off the waterfall, threw in a Mosquito Dunk and took a break for a couple days. The Mosquito Dunk I had purchased at the pond store and had been assured it would be safe with my dog and other animals (it targets all fly larvae in the water). I suspect it may not be ideal for a native, nontoxic garden but left unchecked and stagnant, my backyard would have been uninhabitable due to the mosquitoes, so it is a compromise I can live with for now.
After watching a dozen more DIY waterfall videos, I was ready to try again. First, I went to a stone supply contractor and picked out several boulders. They were small enough for me and one other person to move but big enough to make a statement. Big boulders are the way to go to make a waterfall feature special, in my opinion. I purchased over 1000 pounds in boulders (which is only about 15 large rocks). Also, I started at the bottom layer, furthest from the spillway. The last stop for the water before splashing down into the pond. I chose a much smaller flat rock and braced it with large boulders on either side, which I dug down a bit so the bases would be below the water level, giving it a more natural look. It was not intentional, but the boulders are a lighter color than the colors within the waterfall and I do like that look. After those first three rocks, I lifted the liner and built up the dirt behind them readying the waterfall for the next three stones. I tried to choose flat waterfall rocks and boulders with flatter sides facing the waterfall stream.

Since my spillway was coming more from the side, I decided to build in a bit of a shallow pool within the waterfall, both for the birds, and my dog, who prefer a shallow area to drink from. That large rock became the first rock below the spillway. From there I filled in the sides with additional boulders, covered the spillway with another flat rock and started up the waterfall. I was delighted to see that SOME of the water was making it onto that last rock! But not all, so back to the drawing board.
That is when I discovered expanding black foam sealant for ponds, which is basically like liquid foamy concrete. This stuff is the KEY to keep the water out of the cracks and on the rocks where you want it. At least in my world where it has been a few years since I took physics, which I had immediately blocked from my brain anyway. However, this stuff was a MESS and it is definitely a learning curve to use it. I missed the part where it said “fill the gap 1/3 full to allow for expansion.” Now I have black foamy “rocks” all down my waterfall on either side. Plus some random black spots on my boulders where it fell, and a ruined pair of shorts and garden gloves. And just a warning, when you get it on your skin, it takes a few layers of skin with it to get it off. They say to gently add some dirt on the foam to get it to look natural. Yeah, not sure this really worked well for me either. I ran out of the stuff before I got to one side of my bottom rock but it was expanding all over the place and a maddening little mess so I was over it anyway. (I later got some more to complete the job and fill in additional cracks.)

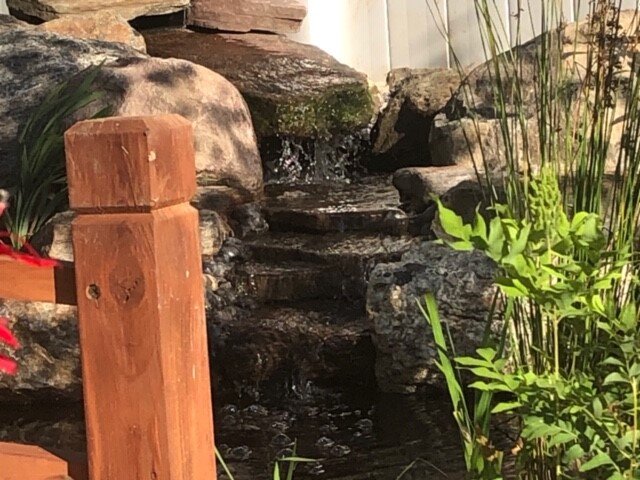
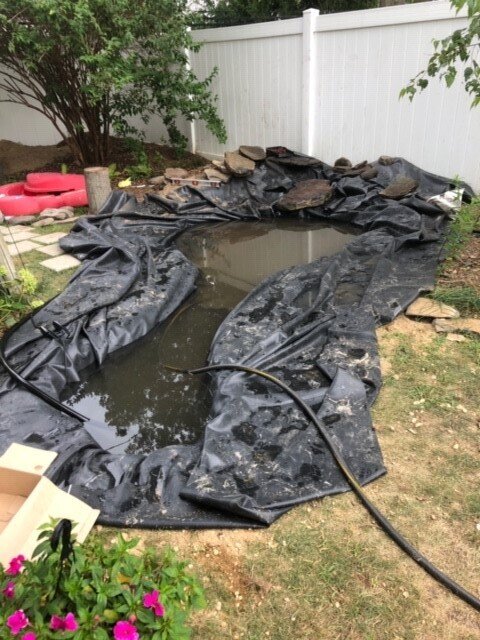
But once that black glue-from-hell dried and cured, I turned on my waterfall and enjoyed the wonderful sound of water flowing and watching the water magically flow down the waterfall and stream. I then turned my attention to the borders of the pond (using mostly rocks that existed around my property), burying/hiding the waterfall tubing and creating the “beach.” And then, FINALLY, I could focus on the plants that were not-so-patiently waiting to be added to the pond.
Planting the Natives
“Put us in, Coach!”
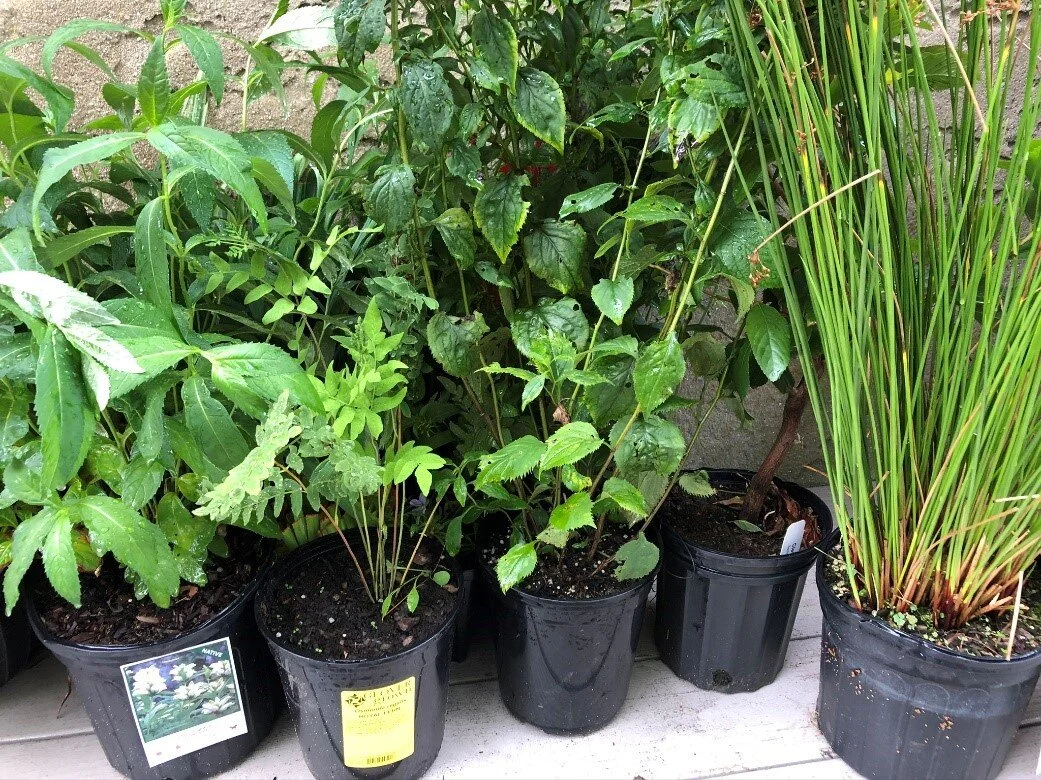
I used both fabric and plastic pond pots and liked both for different reasons. I felt that the fabric was easier to use and smaller (I used 6” round for the Irises) but the plastic was sturdier. It was also larger though, so I had to be sure it fit on my shelves. I used regular top soil (heavier than potting soil) and topped the pots with pebbles. I slowly added them to the pond, allowing the water to saturate the dirt before dropping it in over the top of the pot. My pond is in a moderately shady location, so choosing plants was a little difficult. Also, most garden centers did not sell or know anything about native pond plants. I ended up getting some irises and rush from my local native plant distributer (KMS Plants) and then a few others from Reliable Garden and Pond in Middle Island.
Backyard native water gardens should have floating, emerging, submerged, and marginal plants for the health and diversity of the pond. The floating plants are especially good at clearing out the algae and I found some Lemna minor (Common Duckweed) for $2 a scoop at the pond store. Emerging plants are ones with their roots in the water and leaves in the air. I used Iris versicolor (Blue Flag Iris), Juncus effuses (Common Rush), Peltanda virginica (Arrow arum), Equisetum hyemale (Scouringrush horsetail) and Sagittaria latifolia (Broadleaf Arrowhead). I was fooled by the water lily at the store and bought it because it said Nymphaea “Virginalis” and I took a chance that that meant it was from the east coast. I later found out that it is a cultivar of an either central American or european native and I am on the hunt for the US native Nymphaea odorata. (Virginalis apparently refers to the “virgin white” flowers this lily produces, not Virginia). (See my complete list of emerging, floating and marginal plants below)

Main side of pond with the first pond plants: starting within pond, left, Iris versicolor (blue flag iris), Juncus effusus (common rush) and another two Iris versicolor (blue flag iris) and outside of pond, starting left: Carex flaccosperma (blue wood sedge, in rocks), Chelone glabra (white turtlehead), Solidago caesia (blue stem goldenrod) and Asclepias incarnata (Swamp milkweed).

The waterfall with plants: Clockwise from left – Carex flaccosperma (in the rocks), Chelone glabra, Solidago caesia (hidden), Juncus effusus (in pond), Iris versicolor, Peltanda virginica, Equisetum hymale, and additional Iris versicolor

Completed project from above
reflections, challenges … and ideas for the future!
I have yet to find completely submerged, shade tolerant native plants. My marginal plants are those tolerant of at least part shade and with a variety of tolerable water conditions, including moist/wet. My marginal plants include Osmunda regalis (Royal Fern), Lobelia cardinalis (Cardinal Flower), Clethra alnifolia (Summersweet), Solidago caesia (Bluestem Goldenrod), Asclepias incarnata (Swamp Milkweed) and Carex flaccosperma (Blue Wood Sedge).
I feel like other than the physical strength this project required, I had to face a few significant challenges. First, I should have purchased a pre-fab underlay. It would have saved me a big headache for not a lot of money. Also, at this point, I am dealing with significantly more mosquitoes than I thought possible, although maybe it is also just a really terrible year for mosquitoes, given the warm winter. Foam sealing the rocks had a bit of a learning curve but also had the huge benefit of limiting leakage and making the rocks more secure for when my kids like to pretend they are scrambling up a mountain.
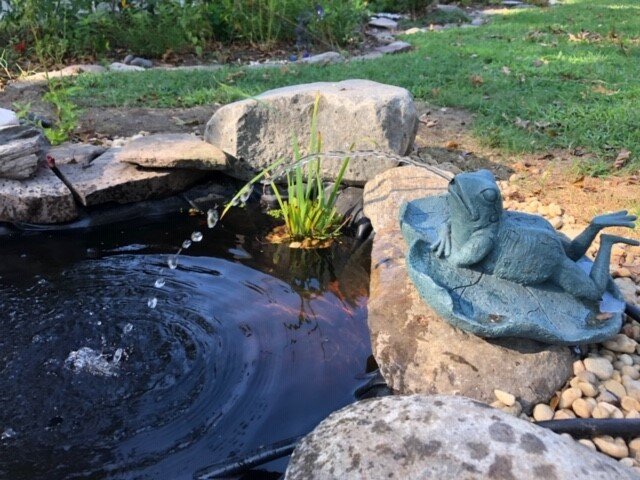
Most of the articles I read stressed that you should put the pond in a place you will often enjoy it, such as next to the patio. My pond is a bit towards the back corner of my yard and difficult to see from my deck. I don’t regret it because I feel like a place a bit further from the doors and constant action may be less noise and more security for the birds. It is a peaceful retreat for me as well now that there is a convenient bench at one end to spend my mornings drinking my coffee and watching the water. I am looking forward to watching my pond mature, grow and blossom and attract more than just my 85 pound labradoodle, who is ecstatic that I installed an 800 gallon water bowl for him. I can’t wait to watch the birds and butterflies stop for a drink and pollinators enjoy the blooming marginal plants. I also hope to add some little native freshwater fish eventually, such as Rosy Red Minnows, at some point in the future to naturally combat the mosquitoes.

Panorama of the back corner of the yard.
This has been my biggest yard project to date and I am thrilled with the results. It is a welcome retreat from the craziness of life right now and the running water brings peace and tranquility, if just for a few minutes. The native plantings align with my hopes for a brighter future for our planet, which starts right here in my backyard, supporting the native insects, birds and small animals. I hope you are inspired to create your own native water garden!
more details for plant nerds!!
Pond area Plant List:
Iris versicolor (2 - 4” pots divided) - 𝘉𝘭𝘶𝘦 𝘍𝘭𝘢𝘨 𝘐𝘳𝘪𝘴
Juncus effusus (1 gallon pot in a 9”x9” fabric pot) - 𝘊𝘰𝘮𝘮𝘰𝘯 𝘙𝘶𝘴𝘩
Solidago caesia - 𝘉𝘭𝘶𝘦𝘴𝘵𝘦𝘮 𝘎𝘰𝘭𝘥𝘦𝘯𝘳𝘰𝘥
Chelone glabra - 𝘞𝘩𝘪𝘵𝘦 𝘛𝘶𝘳𝘵𝘭𝘦𝘩𝘦𝘢𝘥
Carex flaccosperma (1- 3 qt pot, divided x 3)- 𝘉𝘭𝘶𝘦 𝘴𝘦𝘥𝘨𝘦
Clethra alnifolia - 𝘚𝘸𝘦𝘦𝘵 𝘱𝘦𝘱𝘱𝘦𝘳𝘣𝘶𝘴𝘩 𝘰𝘳 𝘚𝘶𝘮𝘮𝘦𝘳𝘴𝘸𝘦𝘦𝘵
Lobelia cardinalis - 𝘊𝘢𝘳𝘥𝘪𝘯𝘢𝘭 𝘧𝘭𝘰𝘸𝘦𝘳
Osmunda regalis - 𝘙𝘰𝘺𝘢𝘭 𝘧𝘦𝘳𝘯
Asclepias incarnata - 𝘚𝘸𝘢𝘮𝘱 𝘔𝘪𝘭𝘬𝘸𝘦𝘦𝘥
Peltanda virginica - Arrow arum
Equisetum hyemale - scouringrush horsetail
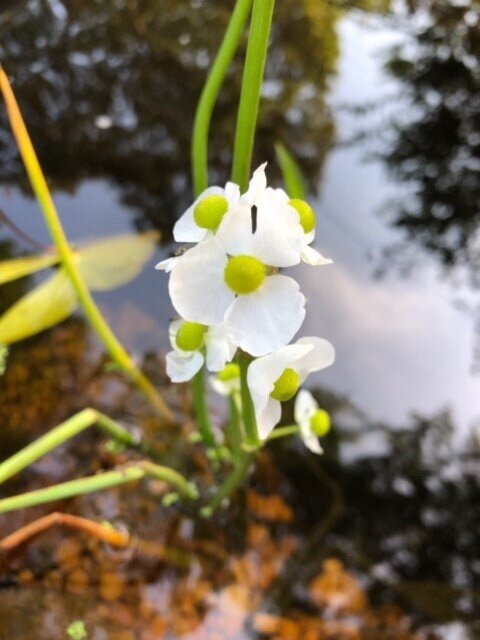
Sagittaria latifolia - broadleaf arrowhead
Nymphaea virginalis - Hardy white water lily
Lemna minor – Common duckweed
Plant sources: KMS natives, ReWild Long Island, Reliable Garden and Pond
Cost List:
Liner, pump and tubing $550 (S. Scherer & Sons in Northport);
Rocks & boulders (All County Block and Supply in Bohemia) probably total about $450 and I had a lot of the peripheral ones already.
Bridge $140 from Wayfair plus stain, waterfall spillway and lava rocks from Lowes.
Plants (so far) were about $250. Additional supplies (black foam, frog fountain, pond pots, about $1420 total.